
If you want to photograph your subjects at their most beautiful, use the golden hours to your advantage. This time of day, the sun is soft and diffused with little contrast. Shutter speeds should be extended and the lighting should be brighter. The photo tips below can help you take the best pictures of the golden hour. Read on to learn more! You can also download the PhotoPills mobile app to help you plan your shooting sessions.
PhotoPills app makes it easy to plan for golden hour.
PhotoPills will help you get started if you're new to astrophotography. The app includes basic planning features such as a meteor shower calendar and exposure calculators. The app also comes with a video tutorial and a user guide to show you how to use its many features. If you're still unsure, you can even get in touch with PhotoPills support team to get help.
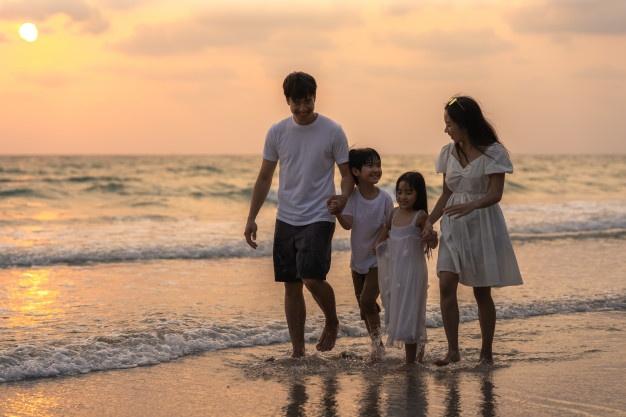
Natural light is soft, diffused and with little contrast
Soft light casts long, diffuse shadows when it is low. Photographers can create illusions using directional lighting and soft shadows because of the low angle of sunlight. These qualities make natural lighting ideal for portraits. Photographing next to a window can help you capture the golden hour of artificial lighting. Here are some tips to make the most of your shots. Use the natural light of your local area to your advantage!
In the golden hour, shutter speeds should not be extended.
Shutter speeds should not be prolonged during golden hour. Because the light levels are lower, shutter speeds can be extended to create more detail in still subjects. Motion shots allow for more creativity. The sunset's orange hue is another great feature of the golden hours. If you want to photograph a landscape during the golden hour, try experimenting with the composition of the horizon. This will allow you to avoid low light problems.
Using sidelight to create a halo
Sidelight is a great way of adding texture to your photos and creating a halo effect during golden hours. Although you will need to be more careful about your exposure, it is possible to achieve the desired effect. But, the golden hour will never be the same as it was the day before. Keep a tripod around and test the exposure settings to prevent this.
Spot metering is a great way to create a halo around your subject
Photographers make the most common error when shooting during golden hours: they overexpose. Spot metering during golden hours will produce better results. In these situations, underexposure is beneficial because it gives you more detail in your pictures and allows you to use a small amount of post-processing. The result is an image with a balanced tone that looks much warmer.
FAQ
Should I take up photography as a hobby or a profession?
Photography is a wonderful way for you to capture your memories and share them. It allows you to discover more about the world.
You can find a lot of online resources that will teach you how to take better images.
You might also consider enrolling in classes at nearby community colleges or art schools. This will allow you to network with other photographers who can give valuable feedback on your work.
Is digital photography hard?
Digital photography isn’t as easy as you may think. You will need to spend time learning how to use these tools correctly. It is important to be familiar with the settings that are best for each type of shot. Experimenting is the best way of learning. Practice makes perfect.
Do I Need A Tripod?
This is one question that everyone wants to know. The truth is that a tripod isn't always necessary, but it can come in handy.
It can be used to steady your camera while you take slow shutter speeds pictures. A tripod can make all the difference when you're photographing landscapes or other stationary subjects.
On the other hand, if you're photographing moving subjects such as sports or people, using a tripod can cause blurriness. How can you tell which situations call for a tripod and why?
A tripod is useful for any situation where you want to photograph fast action or stationary subjects. Examples include:
-
Sports
-
People
-
Landscapes
-
Close-ups
-
Macro shots
Try this test to find out if you really need a tripod. Take your camera and hold it still. Then, look through the scope. A tripod is necessary if you notice blurred lines or movement.
If you don’t see blurring, adding a tripod is unlikely to make any difference.
However, if you do decide to invest in a tripod, here are some tips to keep in mind.
-
You should ensure that your tripod has smooth legs. This prevents unwanted vibrations from shaking your camera.
-
Choose a sturdy tripod. Some tripods may be made from plastic, which can make them less durable. Opt for a sturdy metal tripod.
-
Consider purchasing a remote release. This lets you control your camera remotely. The button can be pressed to activate the shutter.
-
Make sure to look for a tripod that rotates 360 degrees. This makes it much easier to position your cameras horizontally or vertically.
-
Be aware that tripods are not cheap. Expect to spend between $100 and $200. However, you'll get lots of value for your dollar.
-
Accessories such as memory cards and filters are important.
-
Before you buy online, make sure to check your local shops. Many retailers offer free shipping.
-
You can read customer reviews to see what people think of a product.
-
Ask family members or friends to share similar products.
-
You can learn from customers' experiences by visiting message boards and forums.
-
User reviews can be found online.
-
Use websites like Amazon.com to compare prices and read customer feedback.
-
Browse photo galleries to get an idea of what photographers do with their tripods.
Statistics
- While I cannot prove that all of those spots were not sensor dust, the photo was taken during a heavy snowstorm…so I guess that 99.8% of the spots are snowflakes. (bhphotovideo.com)
- The second easiest way to get blurry photos 100% of the time is to use a cheap filter on the front of your lens. (photographylife.com)
- By March 2014, about 3 million were purchased monthly, about 30 percent of the peak sales total. (en.wikipedia.org)
- This article received 13 testimonials, and 100% of readers who voted found it helpful, earning it our reader-approved status. (wikihow.com)
External Links
How To
How to take macro photographs in photography
Macro Photography is defined as the ability to capture small objects such as flowers, insects, and even people at close range. Macro means large in Greek. A lens with a focal length over 50mm can be used to take photos of objects very close up.
A good macro lens must have a long work distance and a fast aperture so that sharp images can be captured without having to move around. It is important to avoid motion while taking photos. Anything that moves during exposure may blur your image.
Here are some tips for taking great macro photographs:
-
Use a tripod. A tripod is a must if you don’t already have one. This way, you'll have less chance of moving while trying to shoot.
-
Select the right lighting. Macro lenses usually come with built in light filters. But if you don’t, you can always buy one. It helps to avoid overexposure.
-
Be patient! Shooting macros takes practice. Even though you might only see one tiny bug or flower at a time, it is worthwhile to continue shooting until you capture it.
-
RAW is the best format for shooting. RAW files can store more information than standard JPEGs. RAW files allow you to make changes such as cropping, color correction and other adjustments later.
-
Don't forget the background. Even though you've got a nice foreground object, sometimes the background adds interest to your shot. It's worth including it in your photograph.
-
Keep learning.