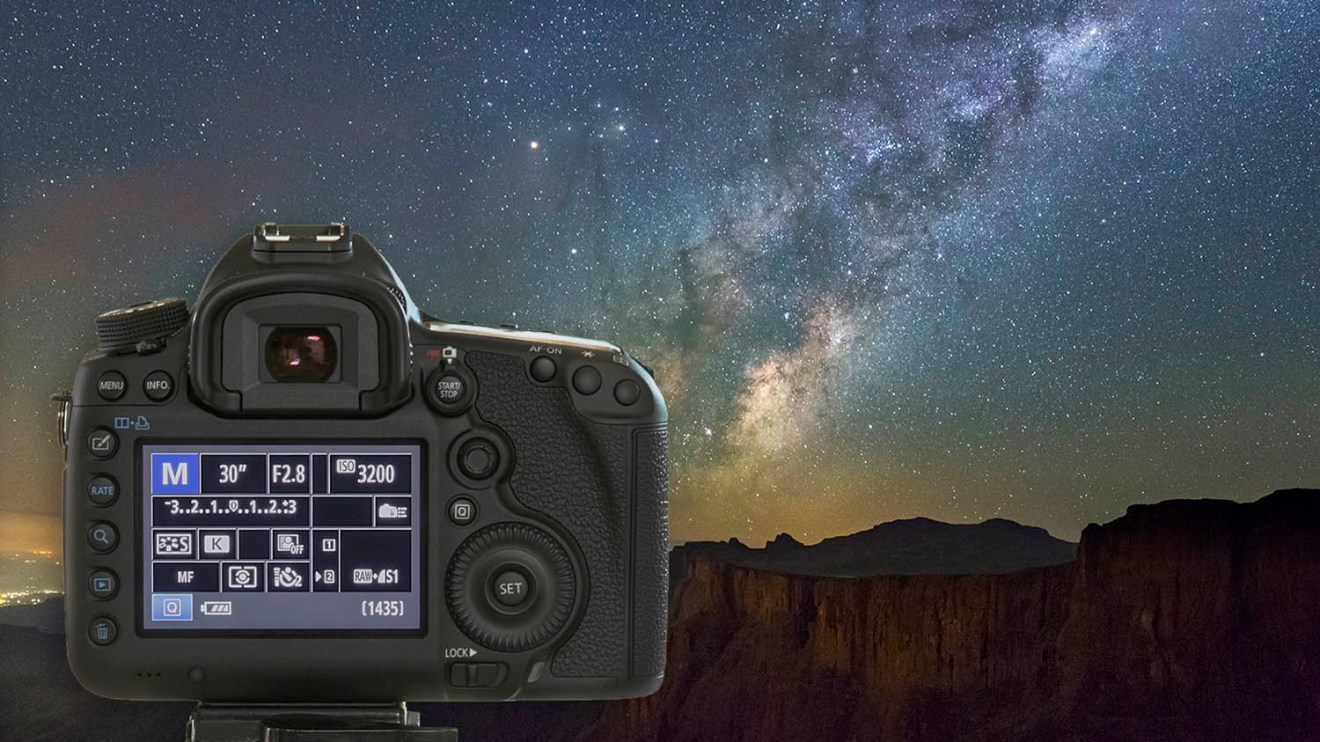
If you want to capture beautiful moon pictures, there are a few things you should do. You should first make sure you are using the manual mode of your camera. Next, increase the ISO. 800 is the recommended ISO. You can adjust your settings if the ISO is too low. The focal length of your lens is another thing to consider. If possible, try to get a lens with a focal length of at least 400mm.
Locations with low light pollution
Low levels of light pollution are the best places to capture images of the moon. Avoid long exposures in locations with high levels of light pollution. However, it's okay to take pictures at night when there is almost no light. There are still places where you can photograph the star trails and the moon, and many other locations where there is no light pollution.
Techniques for locking exposure
It can be difficult to take pictures of the moon, especially with a long telephoto lens. You should ensure that your camera is stable and have a remote shutter release. This can either be wired or wireless. Also, make sure to lock the mirror in order to reduce vibrations.
Telephoto lenses
Even though moon photography can be challenging, there are some things that you can do in order to get high-quality pictures. The first is to ensure your camera has an excellent autofocus system. This will ensure you have a clear focus on the moon. If your camera does not have this feature, you can use manual focus methods. Other features include focus peaking, or electronic guide.
Waiting for the moon to rise in the heavens
It's best to wait until the moon rises in the sky before you take photos. You'll be able to see the moon’s reflection. Additionally, a tripod can be used for camera security. This will reduce camera shake and help you produce sharper images.
Use a slow shutter speed
It is crucial to know the shutter speed when photographing the Moon. The darker portions of the Moon should be visible, and the sky can be added later. A shutter speed of between 1/30th - 1/15th seconds is a good setting for getting a good result. This will avoid overexposed highlights in the moon, and allow for a deeper field of focus. It is also possible to avoid washed out photos that lack subtle visual interest.
Get a close-up shot
To get a perfect moon shot, you need to take extra steps. First, choose a dark, quiet area. You might need to go to a quieter area in your city, or to a nearby park. You will also need to turn off any lighting in the vicinity.
FAQ
Which is the best camera to use for beginners?
The best camera for beginners will depend on your budget, needs and level of skill.
For example, if you're looking to save money, you might choose a point-and-shoot digital camera. These cameras offer good quality but aren't very versatile.
The Digital Single Lens Reflex (Digital DSLR) camera allows you to interchange lenses, allowing you to take different kinds of photos. These cameras are generally more expensive that point-and clicks, but provide greater flexibility.
A beginner's kit for beginners is a good place to start. The package includes everything you need: a camera, lens, memory cards, tripod, flash and a camera body.
Also, don't forget about extra batteries!
What is the rule or thirds?
The rule to thirds is a great way to create interesting compositions. This divides your image horizontally and vertically into nine equal parts. This creates three main areas in which you want your subject. These are the top and middle thirds (in the upper left corner), as well as the bottom and lower right. These areas can be used as guidelines for positioning your subject within the frame.
You can avoid placing important elements too close together, or too far apart, by using the rule of thirds. If they are too close to each other, it may be difficult for them to make a strong visual impression. If you put them too far apart, they might lose focus because there isn't much room around them.
Do I Need A Tripod?
This is one those questions that everyone has to ask. A tripod isn’t always needed, but it can be very useful.
This allows you to keep your camera steady even when taking slow shutter speeds. A tripod can be very useful if you want to photograph landscapes and stationary subjects.
However, using a tripod to photograph moving subjects like people or sports can result in blurriness. So, how do you know which situations require a tripod?
A tripod can be useful in any situation where you need to capture fast action or stationary subjects. Examples include:
-
Sports
-
People
-
Landscapes
-
Close-ups
-
Macro shots
Do this test to see if you are unsure if you require a tripod. Hold your camera still and look through the viewfinder. You will need a tripod if you see blurred lines and movement.
If you don’t see blurring, adding a tripod is unlikely to make any difference.
However, if you do decide to invest in a tripod, here are some tips to keep in mind.
-
Make sure your tripod has smooth legs. This helps to prevent vibrations from shaking the camera.
-
A tripod is a good choice. Some tripods can be made out of plastic but they are not very durable. Look for a metal tripod instead.
-
Buy a remote release. You can control your camera remotely with this remote release. It can automatically fire the shutter when you press the button.
-
Look for a tripod that has a 360-degree rotating head. This makes it easier to position your camera vertically or horizontally.
-
Tripods are expensive. Expect to pay $100-200. But, you will get a lot for your buck.
-
Don't forget about accessories like filters and memory cards.
-
Before buying online, check with your local store. Many retailers offer free shipping.
-
Review a product to find out what other customers think.
-
Ask family and friends who have similar products.
-
To learn more about customer experiences, you can visit forums and message board.
-
You can search online for reviews from other users.
-
Amazon.com allows you to compare prices, and receive customer feedback.
-
Check out these photo galleries for an example of the work that photographers do with their tripods.
Is digital photography hard?
Digital photography isn’t as easy as you may think. It takes time and effort to learn how to use the tools properly. You need to know what settings to use for different types of shots. It is best to practice what you have learned. Practice makes perfect.
Statistics
- While I cannot prove that all of those spots were not sensor dust, the photo was taken during a heavy snowstorm…so I guess that 99.8% of the spots are snowflakes. (bhphotovideo.com)
- By March 2014, about 3 million were purchased monthly, about 30 percent of the peak sales total. (en.wikipedia.org)
- That's the easiest way to get blurry photos 100% of the time. (photographylife.com)
- The second easiest way to get blurry photos 100% of the time is to use a cheap filter on the front of your lens. (photographylife.com)
External Links
How To
How to Take Portrait Photos
Portraits are important because of their ability to show who you actually are. Portraits also tell your story. You may have a favorite picture of yourself when you were younger, but now you want to capture something new. It's easy to forget how much fun taking pictures can be. These are some tips that will help you get started.
-
Make sure you have enough light. It is best to take portraits in the morning, or late afternoon. Use flash only when there is not direct sunlight. This will wash out all details. It is best to avoid shooting at midday. Too many shadows will result.
-
Use a tripod. The camera will not move if it is held still. It will also prevent you from freezing action. Also, if you do plan on using a flash, prepare your shot without it. You can then turn the flash off and try again.
-
Shoot close-ups. Closeups allow you to show detail. If you have a bad eye, closeups can appear fake. Take a close look at the eyes, mouths, noses and ears of others. Notice anything unusual? Do you see someone with glasses? Are there freckles across her nose? These elements add depth to a person’s appearance.
-
You shouldn't force smiles. Smiles are difficult. Many people smile naturally when happy. However, others may not. Forcing them to smile is a bad idea. You should think about what makes your laugh. Perhaps you laugh at silly things, such as a cat jumping through an hoop. Or maybe you love watching paint dry. Whatever it may be, don't stop thinking about it until your heart starts to laugh.
-
Creativity is key. People often think of themselves as boring. However, being boring is not a bad thing. Try to find ways to break away from the norm. One way to break the mold is to ask him to hold his hands behind his head. Perhaps you could suggest having him put on a funny hat.
-
Keep practicing. You will improve your ability to capture moments if you keep practicing every day. You will notice more interesting things as you get better.
-
Have fun. Photographing should be fun. If you enjoy the experience, you will be more likely do it again. You'll likely end up with some truly amazing shots.
-
Your work should be shared. After you've learned how to take beautiful pictures, share them among your friends and family. Tell them why it was taken. Show them where you went. Tell them what you did.
-
Be patient. Sometimes it just doesn't work. It happens to everyone. Don't worry. Move on to the next image.