Photography is a vast subject. You should be familiar with light, angle, depth, and reflections. These can help you improve your photography. It is also possible to learn how to use camera features, such as the Telephoto Lens. You'll soon be able to master these skills and become a skilled photographer.
Understanding light
Great images can only be created if you understand the quality and effects of light. How light falls on a subject has a huge impact on its physical appearance, mood, and emotional response. Knowing how light falls on a subject will help you capture images that are both authentic and professional. Learn how light falls onto different types and how you can use this information in a photo.
Two broad categories of light exist: natural and artificial. The sun produces natural light. However, natural light can also come in other forms, including candle flames and forest fires. However, there are significant differences between these types despite their similarities.
Understanding angles
A key part of improving your photos is understanding angles. Angles are essential for a number of reasons. They can help give your photos drama or stability. A good way to improve your photos if you're just starting out as a photographer is to learn more about angles. The following are some examples of angles you can use in your photography.

A overhead shot can convey strong emotions. A low angle can convey a more subtle message. A high angle will send a strong message.
Understanding the field depth
An important aspect of photography is the use of a depth–of-field setting on your digital camera. This setting controls how much light is hitting your sensor. A wide aperture will make your photos appear shallower, while a narrow aperture makes them look more spacious. It can be difficult to change the aperture on your camera as it will affect the exposure of the photo.
In many ways, depth of field can affect your photos. There are many factors that influence depth of focus, such as aperture, focal length and distance from the subject. This video explains how to control depth of field.
Understanding reflected light
Reflected light is light that bounces off a surface and back into the photo. The easiest way to describe the difference between specular and diffuse reflections is to think of the light as bouncing back into the shot. It is important to keep in mind that the angle or incidence equals reflection.
The angle of reflection and incidence determine the amount of light that is used in photography. Maximal illumination is possible by using the angles. An angle of reflection is especially helpful when the subject is bright. This is because reflections can leave a spot in your photo that isn’t there. You need to position the camera at an angle that reduces the amount of light coming from the subject when lighting it.
Photography with reflected light can be challenging. Reflected light can bounce off surfaces that don't have opaque materials, making shadows appear lighter/dimmer. While not as powerful as direct lighting, it adds complexity to the image. It is important for photographers to consider how reflected light affects the dark areas of their photographs.
Understanding boudoir photography
Understanding boudoir photography goes beyond knowing how take pictures. It requires practice and study. It takes a lot of practice to be able to take great boudoir shots. Other equipment may be required, such as a softbox and speedlight.
Remember to be comfortable with the model when taking a photo of boudoir. Bodoir images will be more enjoyable if you are able to create a relaxed mood. If you're posing for boudoir, focus on your jawline and not the 'V frame' of your face. Bodoir photography is also possible for males. This technique is called dudeoir.
FAQ
Light Room can be used to enhance your photographs.
To ensure that you get the best photos for your project, it is best to start early. It's better if you take as many shots possible before you decide on the ones that give the most value.
Lightroom makes this possible by showing you how different settings affect each photograph. These settings can also be modified on-the-fly in Lightroom without ever having to open Photoshop again. This allows you to quickly experiment with what looks good and what doesn’t.
Do I Need A Tripod?
This is one of those questions that everyone asks. Although a tripod might not always be needed, they can be useful.
It can be used to steady your camera while you take slow shutter speeds pictures. Tripods can be a huge help when you are shooting landscapes or stationary subjects.
On the other hand, if you're photographing moving subjects such as sports or people, using a tripod can cause blurriness. How do you decide which situations are best served by a tripod.
A tripod is an essential tool for photographing fast-moving subjects or stationary objects. Examples include:
-
Sports
-
People
-
Landscapes
-
Close-ups
-
Macro shots
Try this test to find out if you really need a tripod. Take your camera and hold it still. Then, look through the scope. A tripod is necessary if you notice blurred lines or movement.
If you don’t see blurring, adding a tripod is unlikely to make any difference.
These are just a few tips to help you decide whether or not to purchase a tripod.
-
Smooth legs are important for tripods. This helps prevent vibrations that could shake your camera.
-
Use a sturdy tripod. Some tripods are made of plastic, so they may not be as durable. Look for a metal tripod instead.
-
Buy a remote release. You can control your camera remotely with this remote release. You can set it to fire the shutter once you press the button automatically.
-
Look for a tripod that has a 360-degree rotating head. This makes it much easier to position your cameras horizontally or vertically.
-
Keep in mind that tripods aren't cheap. Expect to spend between $100 and $200. However, you'll get lots of value for your dollar.
-
Don't forget accessories such as memory cards or filters.
-
Before buying online, check with your local store. Many retailers offer free shipping.
-
Review a product to find out what other customers think.
-
Ask family members or friends to share similar products.
-
Visit forums and message boards to learn about customer experiences.
-
You can search online for reviews from other users.
-
Amazon.com makes it easy to compare prices and see customer feedback.
-
See photo galleries to see some of the creative uses for tripods by photographers.
Which is the best camera to use for beginners?
The best camera to use for beginners is dependent on your needs, budget, and skill level.
For example, if you're looking to save money, you might choose a point-and-shoot digital camera. These cameras can be very versatile, but they offer excellent quality.
Digital Single Lens Reflex (DSLR) cameras can be equipped with interchangeable lenses that enable you to shoot different types. While they are more expensive than point and shoots, they offer much more flexibility.
A beginner's kit for beginners is a good place to start. The package includes everything you need: a camera, lens, memory cards, tripod, flash and a camera body.
Do not forget to get extra batteries!
Statistics
- While I cannot prove that all of those spots were not sensor dust, the photo was taken during a heavy snowstorm…so I guess that 99.8% of the spots are snowflakes. (bhphotovideo.com)
- Get 40% off Adobe Creative Cloud(opens in new tab) (creativebloq.com)
- There are people out there who will pick at flaws they can only see in 100% crops of your photos. (wikihow.com)
- The second easiest way to get blurry photos 100% of the time is to use a cheap filter on the front of your lens. (photographylife.com)
External Links
How To
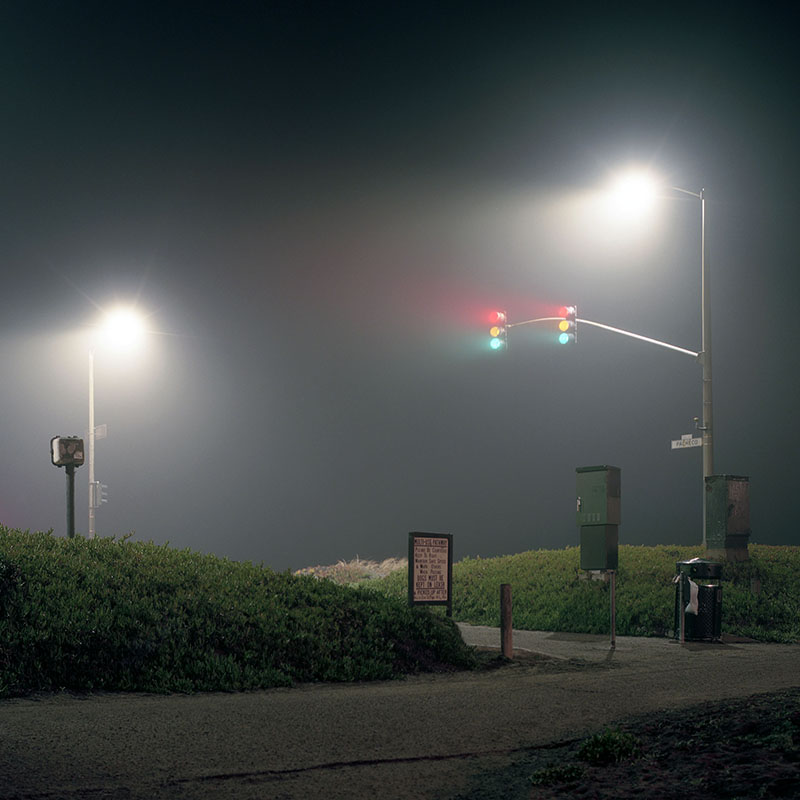
How to take photos in low light conditions
Low-light photography refers to taking photos in dimly lit or dark environments. It requires special equipment. The main challenges are controlling exposure, white-balance, and sharpness. There are two types low-light photography: ambient and flash. Flash photography works best when there is enough lighting around. You will need a flash if you don't have enough natural light. If your subject is outdoors but indoors, you might not have enough light to take a great picture without a flash. Shooting at night in the moonlight hours is a good alternative to using a flash. This will allow you to get nice shadows and colors. Another option is taking photos at twilight. Twilight occurs when there is still daylight but the sun has set.
Long exposures may be something you want to explore. Long exposures let you capture images even after the shutter has been open several minutes. The camera records only light falling on the sensor if it is kept closed. This light falls onto the sensor even after a long exposure. The shutter was not opened, so no new light entered the lens. As a result, you see very little movement. Turn off autofocus and autoexposure to ensure you get clear images. Adjust the ISO setting before you start to shoot. An ISO setting of 200 allows you to adjust how bright or dark the image looks. Finally, when you're ready to take the shot, press the shutter button quickly. This will make the shutter close completely. Next, hold the shutter button down until the end. You can prevent any additional light entering your camera by holding the shutter button down. Once you have taken your picture, wait for a few moments before you release that shutter button. This allows the camera time to process the photo. You can view your photos while you wait on the camera. Once you are satisfied with the photos, save them onto your computer.