This article will provide a basic overview of photo composition. You will learn the rules of thirds, how to achieve depth, use symmetry, and how to compose your photos symmetrically. We will also be discussing how to use frames to add drama in your photos. Frames can be used to frame beautiful gardens or distant grand mansions. Use symmetry and lead lines to create eye-catching photos that will grab viewers.
Rule of thirds
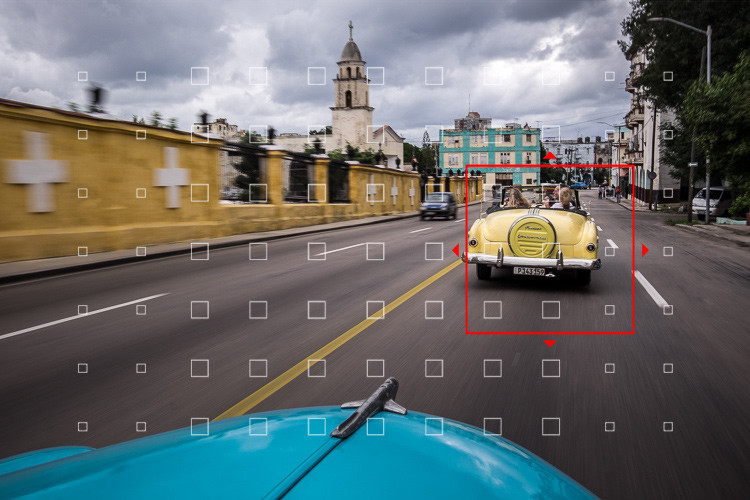
The rule of thirds can help you create a more balanced photo. It is important to make sure your subject takes up only a third of the frame. A grid overlay can help you to decide where the subject should be located relative to the rest of the elements. This method works well with both horizontal and vertical images. These points can be used to align the subject to the rest.
When photographing landscapes, the Rule Of Thirds is an effective way to compose the image. A landscape typically has three elements, which are land, water and sky. The rule helps you break up your composition into three equal sections, and it allows you to highlight one part more than the other. Two top sections of an image should be dedicated to the sky and the bottom section should be filled by land. This allows the viewer to see the entire photo from one side, while the subject is the center.
Maintaining balance
Beginners often struggle to grasp the concept and importance of balance. Although the rules of composition in photography are fairly straightforward, it is important for beginning photographers to understand how to create balance. The proportions of different elements in an image are called balance in photography. A well-composed picture has elements that complement one another equally, creating a sense both of harmony as well as visual tension. Here are some tips to master the art of composing a photo that is balanced.
Photography requires balance. This subject is actually a topic that perception psychologists have been studying for decades. Visual balance is affected by color, size, shape, and other factors. The image may appear out-of-focus or tilted if the balance is not maintained. In addition, the rule of composition states that the subject must look into the picture rather than into the frame. The key to creating visually appealing photographs is keeping things in balance.
Creating depth
A few simple tips can make it easy to create depth in a photograph composition. For starters, you need to place elements closer to the camera, and then make the background appear farther away. The goal is to give the viewer enough room to explore the image. Besides, depth can make the image look more appealing and more realistic. Read on for more tips and techniques! Nick Page has a portfolio that offers more inspiration.
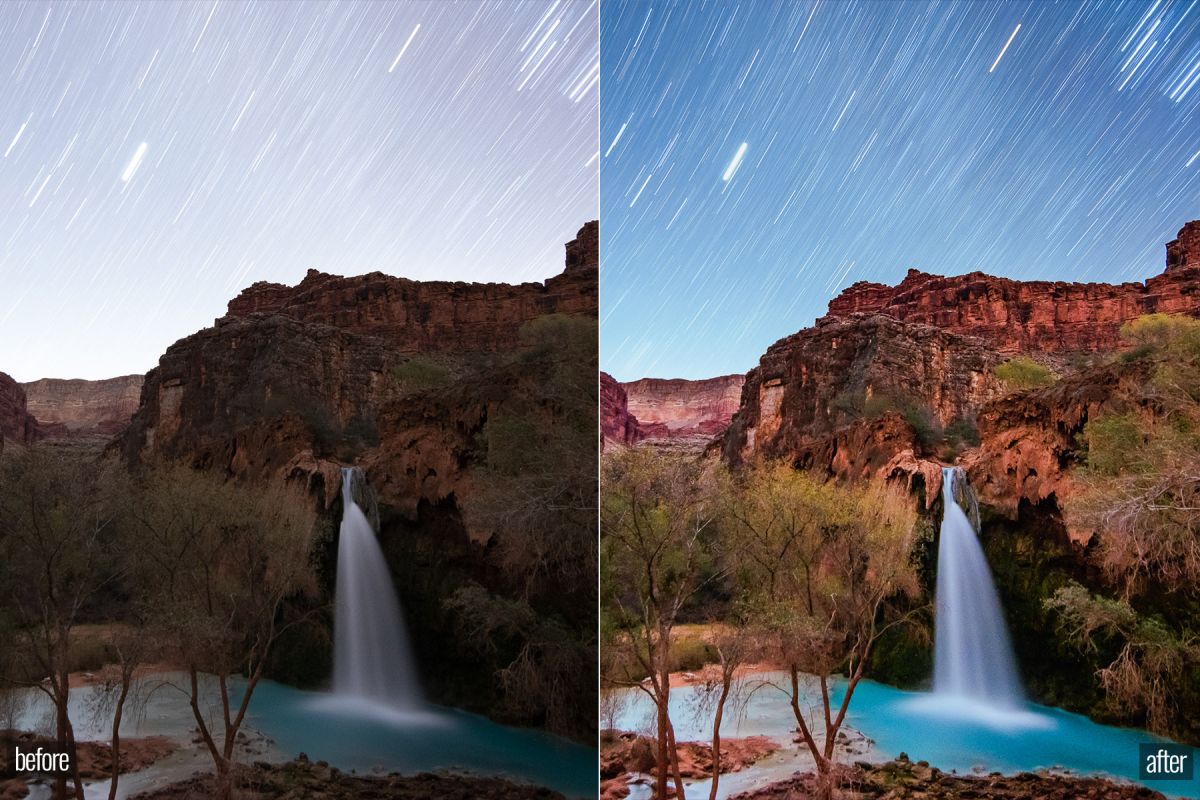
Different lighting options can create depth to a photograph. Lighting your subject in a different light from the rest can create depth. Back-lighting, for example, can create depth to your photograph. Back-lighting will make the subject stand out from the background, making it appear more three-dimensional. Back-lighting can also be used in different colors.

Use symmetry
Using symmetry in photography composition for beginners is easy once you have the basics down pat. It can make your images more interesting and unique by creating balance between different parts of the scene. Try taking photos of your self in various places, if you're not sure where to start. Self-portraits are great for practicing symmetry as they can be made anywhere. Because of their physical characteristics, people are perfect subjects for practicing symmetry. You can either take them in close quarters against the wall or at a distance.
You can create symmetry images if you live in a large city. Smaller towns can allow you to concentrate on details of the house. Many house elements work well with symmetry, including windows, door frames, and shutters. Your mailbox can be even photographed! It doesn't matter if you have symmetry, interesting images can still be created.
FAQ
Where to Buy Cameras?
There are many online places where you can purchase cameras. However, we recommend buying from a reputable retailer like B&H Photo Video. They are able to assist you with any questions.
B&H ships quickly and securely to make it easy for you to get your order to your door.
Check out this video to learn more about purchasing cameras.
Light Room can be used to enhance your photographs.
The best way to ensure you have the perfect photos for your project is to start early. It's better if you take as many shots possible before you decide on the ones that give the most value.
Lightroom allows you to do this by letting you see how different settings affect each photo. You can adjust these settings instantly without returning to Photoshop. This allows for quick experimentation with what looks good or not.
Which is the best camera to use for beginners?
The best camera to use for beginners is dependent on your needs, budget, and skill level.
For instance, you could choose a point & shoot digital camera if your goal is to save some money. These cameras offer good quality but aren't very versatile.
A DSLR (Digital Single Lens Reflex) camera has interchangeable lenses that let you shoot different types of shots. These are typically more expensive than point-and-shoots, but they provide much greater flexibility.
For those new to photography, a beginner's kit is a great place to start. Everything you will need, including a tripod, flash, memory cards and lens, can be found in one package.
You should also remember to buy additional batteries.
Should I begin photography as a hobby.
Photography is a wonderful way to share memories with family and friends. You can also learn about the world around your camera.
If you are interested learning how to take better photos, there are plenty online resources that can help.
You might also consider enrolling in classes at nearby community colleges or art schools. This allows you to meet other photographers who can provide valuable feedback on your work.
Statistics
- While I cannot prove that all of those spots were not sensor dust, the photo was taken during a heavy snowstorm…so I guess that 99.8% of the spots are snowflakes. (bhphotovideo.com)
- This article received 13 testimonials, and 100% of readers who voted found it helpful, earning it our reader-approved status. (wikihow.com)
- By March 2014, about 3 million were purchased monthly, about 30 percent of the peak sales total. (en.wikipedia.org)
- There are people out there who will pick at flaws they can only see in 100% crops of your photos. (wikihow.com)
External Links
How To
How to take macro shots with photography
Macro photography is the ability to capture small objects, such as insects and flowers, at close range. Macro (from the Greek makros, meaning large) is from the Greek word makros. If your lens has a focal distance greater than 50mm you can photograph objects that are extremely close up.
A macro lens that is good should have a long working range and a fast aperture to get sharp images. Also, avoid moving while taking photos as it could blur your image.
Here are some tips and tricks to make great macro shots:
-
Use a tripod. Use a tripod. This will reduce the chance that you move when trying to take photos.
-
Make sure you choose the right lighting. Many macro lenses have built-in light filters. If you don't already own one, get one. This helps prevent overexposure.
-
Be patient! Shooting macros takes practice. Sometimes you might only be able see a very small insect or flower. However, it's worthwhile to keep shooting until it appears.
-
RAW files are best for shooting. RAW files store more data than standard JPEGs. RAW files allow you to make changes such as cropping, color correction and other adjustments later.
-
Remember to include the background. Sometimes the background can add interest to your shot, even if you have a great foreground object. It's worth including it in your photograph.
-
Keep learning.